How to use 7-ZIP to archive and compress your files? 7Zip is a great file compression and archiving tool. However, it’s unfortunate how only professionals and advanced users are the ones who know about it. So to give credit to this amazing tool, we will teach you a simple guide on how to use 7Zip. You can also 7zip download from our site.
There are too many file compression programs available online and among the most commonly used nowadays are WinZip and WinRAR. On the other hand, a lesser-known choice is 7Zip. It is free and has the smallest compression compared to the prior options.
The thing is, not many are aware that it is available till the time that it is introduced to them. Thus, they are often clueless about how to use 7Zip or the benefits it has to offer. They are also not aware that it can also have archive errors sometimes.
Is 7Zip safe? Which is a better tool, 7Zip vs WinRAR? Those are the few questions you need to learn after exploring how to use 7Zip so you can manage the 7Zip command line.
Contents
What is 7Zip?
Well, 7Zip as mentioned earlier, is a file archiver coupled with a high compression ratio both for GZIP and ZIP formats. This is between 2 to 10 percent better than other tools available.
7Zip boosts its own format delivering a high compression ratio that is roughly 40 percent higher. This is primarily because 7Zip is using LZMA as well as LZMA compression. In addition, it has dictionary sizes and superb compression settings.
Zip tool has gained its appeal and worldwide interests primarily because of its ability to compress files efficiently. However, this doesn’t stop 7Zip to show that it can match the bigger and more established names in the industry.
How to Install 7Zip
After the 7Zip download and launching, you will be amazed by how easy and simple to navigate through its user interface. In downloading 7Zip for Mac or Linux, just follow the steps discussed.
- Go to 7Zip’s home page and choose the version you wish to download.
- As of this writing, these are the versions available.
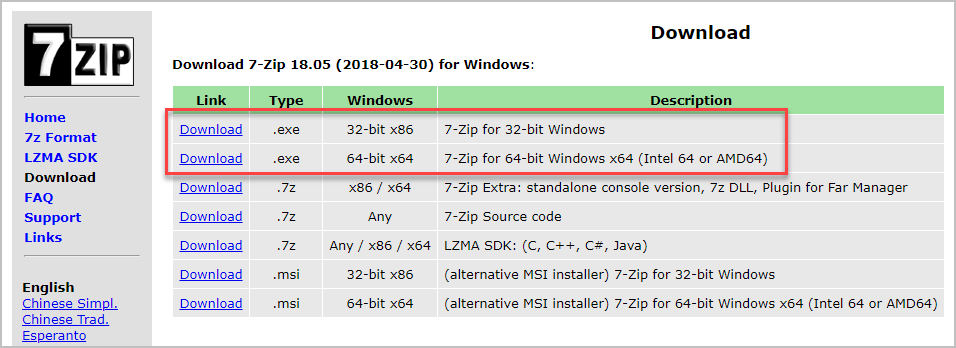
- Choose the version you want and click on the “Download” button.
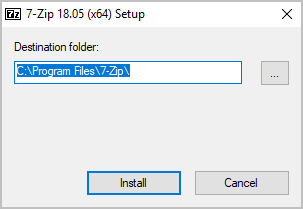
- A new window appears which asks you what directory you like to install the program. Choose the destination folder you wish to save the program and click “Install”.
- Once the 7Zip is installed, hit the “Finish” button.
That’s everything you have to do. Now, let’s proceed on how to use 7Zip and other vital product details and information.
Inside the window, you’ll see the main toolbar containing the most useful features and other menus that let you dig deeper and be accustomed to its UI. Some of the features are briefly discussed below:
- Extract – a button that allows you to accept or browse for the default destination path for your file easily.
- View – this menu contains the “Folder History” as well as the “Favorites” menu which allows you to save to as much as ten folders.
7Zip can integrate with the Windows Explorer menu which displays archive files as folders. At the same time, it provides a toolbar with a drag-and-drop feature. It is possible as well to switch between a single or even dual-pane view. 7Zip password protect can help you protect the program.
How to Use 7-Zip: Compression
We’ve discussed and learned the installation procedure as well as a quick overview for 7Zip. Now, we will move on to properly use 7Zip both for compressing files and extracting them. At first, let’s proceed with compressing files.
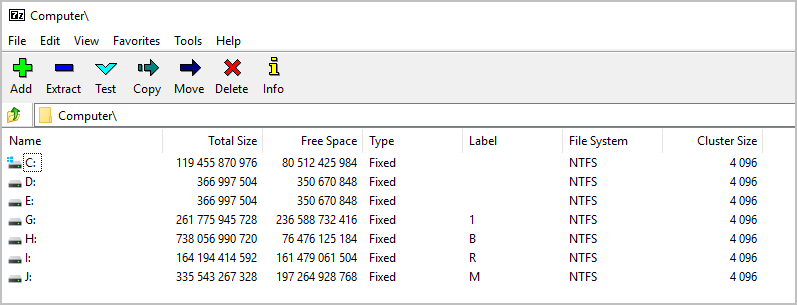
- Step number 1. Open 7Zip File Manager.
- Step number 2. Click on what file you wish to compress and click “Add”. This will identify the file that you need compress.
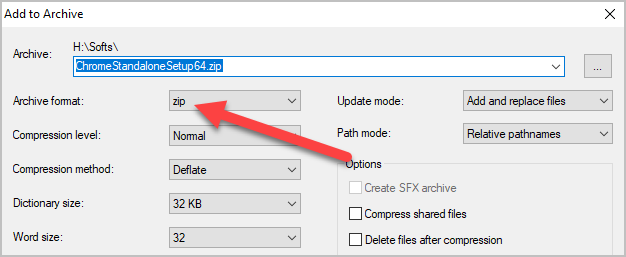
- Step number 3. “Add to Archive” window is going to pop up. Ensure that your Archive format is set to “Zip” and then hit the “OK” button.
- Step number 4. 7Zip will now process the file and compress it in a zip file that’s located in the same destination where the original file is.
How to Make 7Zip Default Windows 10
There are several ways to make the 7Zip archiver as the default setting for Windows 10. the simplest method is by changing the file associations from within the 7zip.
When it comes to file compression and extraction tools, 7Zip has gained immense popularity among users worldwide. 7Zip not only exhibits superior compression ratios and quick extraction speeds but also boasts a user-friendly interface, allowing even the most inexperienced users to navigate through its features effortlessly. In a world where file sizes are ever-growing, having a reliable and efficient file compression tool is essential.
By default, Windows 10 opts for its built-in compression software, which gets the basic job done but has certain limitations. Therefore, many Windows users now prefer switching to 7Zip as their default compression and extraction tool. Fortunately, making this change is a simple and straightforward process that offers numerous benefits.
First and foremost, one of the primary reasons users opt for 7Zip as their default compression tool is its exceptional compression ratio. File compression reduces file sizes by eliminating redundancy and compressing data efficiently. 7Zip stands out for its ability to compress files into considerably smaller sizes than other tools on the market, thereby saving valuable storage space. Users with limited storage capacity or those regularly dealing with large files will greatly benefit from the drastic reduction in space usage that 7Zip provides.
Additionally, 7Zip’s extraction speeds are lauded by many for their swiftness. The software’s unique algorithm ensures that the process of extracting files from compressed folders is quicker and more efficient. Time is of the essence for those frequently working with compressed files, and 7Zip’s faster extraction speeds greatly enhance productivity and workflow.
Now you may wonder, how exactly can you make 7Zip your default compression and extraction tool on Windows 10? Well, fear not, for the process is a simple one. All you need to do is follow a few easy steps.
The first step involves downloading and installing the 7Zip software onto your computer. The official website offers a safe and reliable download, so make sure to obtain the software directly from there. Once downloaded, follow the installation instructions, which are generally intuitive and easy to follow.
Once the installation is complete, right-click on any compressed folder on your Windows 10 system. From the context menu, navigate to the “Open with” option and click on “Choose another app.” Here, search for 7Zip and double-click on it to select it as the default program for handling compressed files.
Congratulations! You have successfully set 7Zip as your default compression tool on Windows 10. Now, anytime you encounter a compressed file, Windows will automatically use 7Zip to extract its contents, providing you with all the benefits and user-friendliness this powerful software offers.
To recap, opting for 7Zip as your default compression and extraction software on Windows 10 is a wise choice. Its superior compression ratios, swift extraction speeds, and user-friendly interface make it a standout option. Making this change ensures that you will enjoy the benefits of optimized file management, reduced storage requirements, and enhanced productivity. So, why stick with the Windows 10 default when there is a better alternative? Make the switch to 7Zip, and you won’t be disappointed.
Extraction
When extracting files, there are 5 straightforward steps you need to do. Just check the instructions below.
- Select the files that you want to extract.
- Choose files you wish to extract and press right-click. This will open a new menu.
- Hover over the “7Zip” option.
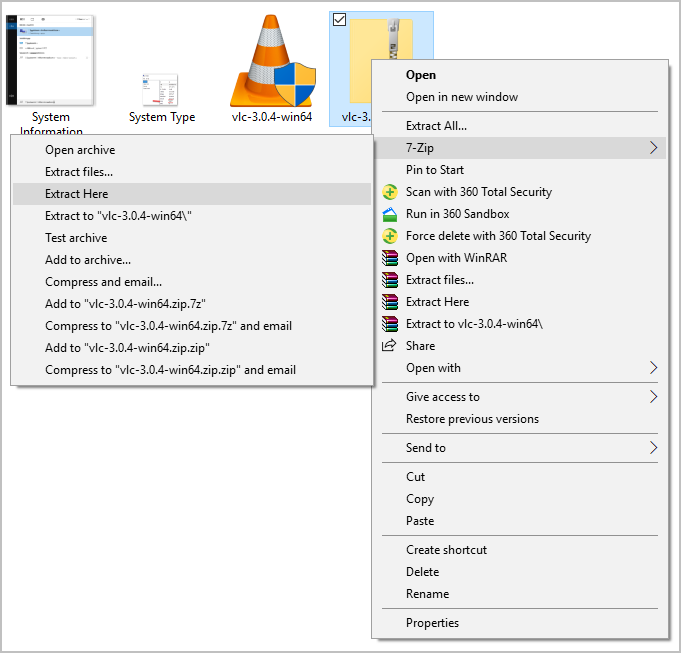
- Choose “Extract Here”. This brings up a new window that shows the progress as well as the remaining time before extracting the file.
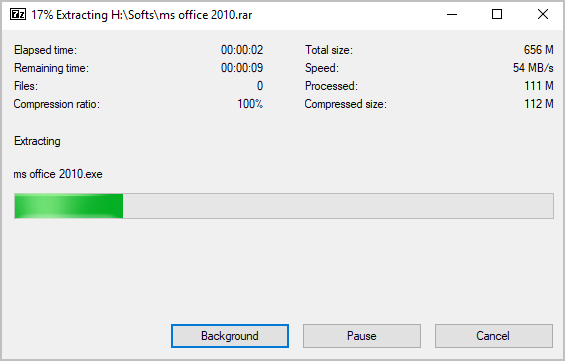
- Wait for it to finish. The extracted file will appear in the same directory where you have all RAR or 7Zip files in.
Product Specifications
7Zip is offering multiple features which makes it one of the best and most effective software compression tools that deliver the lowest compressed data. Few of its remarkable specs are:
- Open Architecture – the source code is using GNU LGPL license while the unRAR code is a combination of license with unRAR + GNU LGPL restrictions.
- High Compression Ratio – by taking advantage of its own 7z format w/ LZMA as well as LZMA2 compression, it allows 7Z to achieve a 40 percent compression ratio or higher compared to its peers. For GZIP and ZIP formats, 7Z delivers a compression ratio that’s 2 to 10 percent better compared to WinZip and PKZip.
- Strong AES-256 encryption – this one includes both encryption and password protection of filenames and files.
- Ability to use multiple encryptions, conversion or compression methods – to give you an example, 7Z can support several packing as well as unpacking for XZ, GZIP, ZIP, TAR, WIM, and 7z It also has support for a self-extracting ability for 7z format.
- Integrates with Windows Shell – by using the menu options, it is feasible to integrate 7z to the Windows Shell menu.
Conclusion
These are the spec sheet that made 7Zip a strong competitor among the leading compression tools on the web. The best part, 7z is available and downloadable free of charge! If you’re afraid that you don’t know how to use 7Zip, which stops you from switching, follow the steps above. Start to enjoy the lowest compression at no price.
Very ambiguous. No mention on where to find the 7-zip file manager, but stated “Click on the 7-zip file manager”. I couldn’t get past that point, and consider the whole tutorial USELESS.
Dull enough to fail to click on search button for it.
Is it possible to password protect a zip file instead if each individual document in that file?
May I make a suggestion? (I am trying to learn to use 7Zip.)
It would be helpful to have the following info in the instructions (maybe as an add-on): 1. How to go about putting 3 files into one 7Zip to be sent.
2. Does the recipient need to have 7Zip to extract the file(s) and/or can other zip programs do the extracting.
I now see 7Zip, Tutorials. I will look there.
Put all files in one folder, then right click on the folder and select one of the “Add to” features.
It will not work for me
But how does one update a compressed file with new or changed files. And delete files that are no longer in the source?